XDC Network: Revolutionizing the Future of Decentralized Finance and Global Trade
XDC Network is a pioneering blockchain platform tailored to meet the evolving needs of decentralized finance (DeFi) and global trade. With its unparalleled speed, scalability, and cost-efficiency, XDC Network has become the go-to choice for developers creating decentralized applications (DApps) and for users looking to engage in the next generation of financial and trade ecosystems.
Key Features and Benefits of XDC Network
-
Compatibility with the Ethereum Ecosystem
Developers can seamlessly migrate their Ethereum-based projects to the XDC Network, taking advantage of its superior speed, scalability, and lower transaction costs.
-
Global Trade and Finance Focus
XDC Network is specifically designed to cater to the needs of decentralized finance (DeFi) and global trade, offering optimized solutions for businesses and financial institutions.
-
Strong Ecosystem Support
Backed by a robust infrastructure, the XDC Network is supported by leading RPC providers, wallets, blockchain explorers, and data indices, along with significant grant programs for developers.
-
Thriving DeFi Ecosystem
XDC Network hosts a diverse range of DeFi applications, including decentralized exchanges (DEXs), lending platforms, and asset tokenization services, driving innovation in the financial sector.
-
Community-Driven Growth
The XDC Network is powered by a dynamic community of developers, validators, and users who actively contribute to its continuous development and global expansion.
-
Comprehensive Asset Support
XDC Network provides extensive support for a wide array of digital assets, ensuring optimal composability and integration opportunities for developers and users alike.
Chains
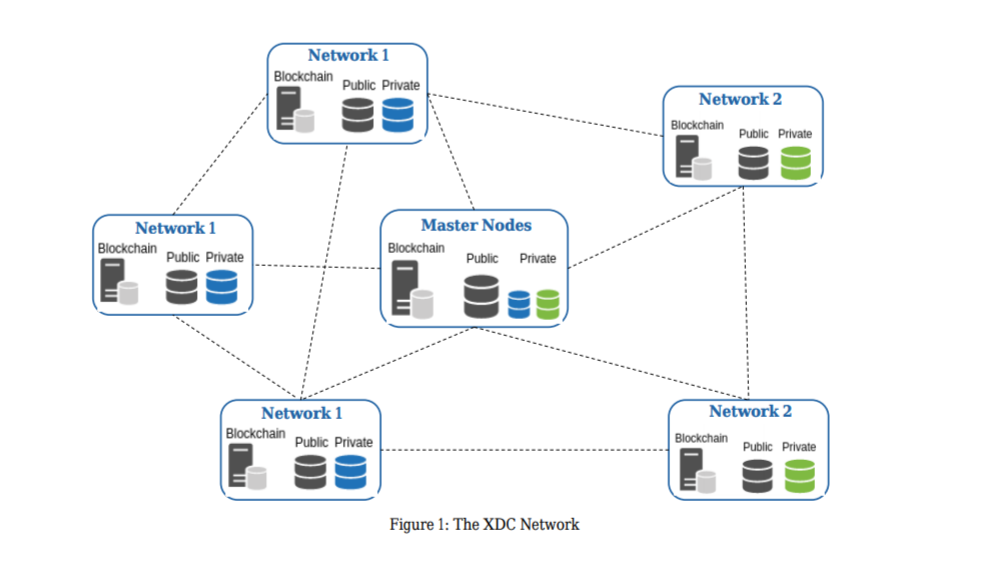
The XDC protocol serves as a messaging and confirmation layer for global payments. Also, the XDC protocol supports smart contracts and Internet of Things (IoT) integrations. As a highly scalable enterprise-grade hybrid blockchain, the XDC protocol boasts a high throughput of 2,000 transactions per second (TPS) and near-instant transaction finality.
Use Cases
-
Decentralized Finance (DeFi)
XDC Network serves as a hub for DeFi activities, offering users access to a broad spectrum of financial products and services, all powered by its efficient and secure blockchain technology.
-
Trade Finance and Tokenization
The XDC Network is optimized for trade finance solutions, enabling the tokenization of real-world assets and providing a platform for secure and transparent global trade transactions.
-
Decentralized Applications (DApps)
Developers can build and deploy a variety of DApps on the XDC Network, leveraging its scalable infrastructure, low transaction costs, and compatibility with the Ethereum ecosystem.
-
Supply Chain Management
XDC Network offers advanced solutions for decentralized supply chain management, ensuring transparency, efficiency, and traceability across global supply chains.
-
Blockchain and AI Integration
As the demand for Artificial Intelligence (AI) grows, XDC Network is paving the way for integrating AI with blockchain technology, providing a robust platform for innovative AI-driven applications.
Quick Start
Get started with XDC Network: Unlock the power of decentralized finance and global trade.
Stay updated with the latest XDC Network announcements and developments.
Obtain the RPC Endpoint for XDC Network
XDC Network Masternodes are the backbone of the network, ensuring lightning-fast transaction validation and enhanced security.
The XDC Chain Network provides a variety of tools and resources to help developers build and deploy applications on the blockchain.
XDC Subnet is a technology that allows you to create a secure, scalable, and decentralized network within the XDC Ecosystem.